Tools needed: 60–100x jeweler’s loupe or USB digital microscope (60–200x)
Dry time: 7–14 days at 60–70°F, 45–55% RH in dark with airflow
Cure time: Minimum 2 weeks in glass jars; 4–8 weeks for optimal flavour and potency
Why Harvest Timing Is the Single Most Important Post-Vegetation Decision
Every decision made during a cannabis grow — genetics selection, growing medium, nutrient protocol, training techniques, lighting spectrum — ultimately creates potential that is either realised or destroyed at harvest. Harvest too early and the plant has not reached peak cannabinoid and terpene production; the effect is typically weak, one-dimensional and sometimes overtly anxious due to an underdeveloped terpene-cannabinoid balance. Harvest too late and THC has begun degrading to CBN (cannabinol), shifting the effect profile toward the sedating end and losing the nuance of the terpene expression that the cultivar’s genetics were bred to deliver.
The harvest window for any cannabis cultivar is not a single point in time but a range spanning several days to over a week. Within this window, growers have genuine ability to tune the final product toward their desired effect profile by choosing when within the ripeness range to cut. This is one of the most sophisticated aspects of cannabis cultivation — the same genetics can produce a stimulating, clear-headed product or a heavy, sedating one depending entirely on the grower’s harvest decision.
Seed-to-harvest timelines are guides, not guarantees. Most commercial seed banks provide estimated flowering times (typically 8–12 weeks after the light flip for photoperiod strains, or from germination for autoflowering genetics), but actual maturity is influenced by growing environment: temperature, light intensity, nutrient availability and stress events all affect pace of trichome development. Relying solely on the seed bank’s stated flowering time without direct trichome inspection leads to timing errors in both directions — particularly in indoor grows where conditions vary from the breeder’s test environment.
Trichome Development: The Definitive Harvest Guide
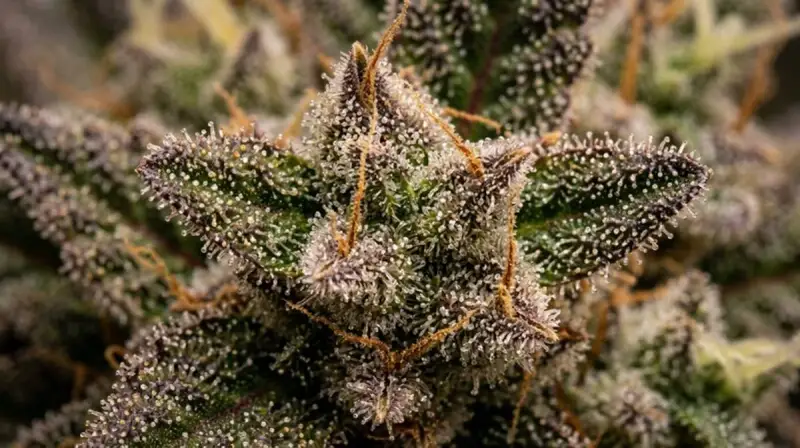
Trichomes are the microscopic glandular structures covering cannabis flowers, small leaves and stems. They are the production sites for all major cannabinoids and terpenes. The three types of trichomes on cannabis flowers are bulbous, capitate-sessile and capitate-stalked. For harvest timing purposes, only capitate-stalked trichomes — the largest, most visible type, consisting of a stalk topped by a spherical resin head — are relevant. These are the structures visible under loupe or microscope magnification as the characteristic mushroom-shaped glands.
Trichome resin heads undergo predictable colour and morphology changes as the flower matures. These changes reflect the accumulation, peak and degradation of cannabinoids within the resin head, making trichome colour the most direct physical indicator of cannabinoid maturity available to the grower without laboratory testing.
Trichome Stage
Appearance
Cannabinoid Status
Effect Profile
Harvest Decision
Clear / Transparent
Glass-clear, no opacity
THCA still building — not at peak
Weak, incomplete, possibly anxious
Too early — wait
Cloudy / Milky
White-opaque, like frosted glass
Peak THCA — maximum THC potential
Stimulating, cerebral, clear-headed euphoria
Harvest now for maximum THC
Mixed Cloudy/Amber
Majority milky, some turning amber
Peak THC with early CBN development
Balanced: euphoric + relaxing body
Optimal for most consumers
Mostly Amber
50–80% amber
Significant THC degraded to CBN
Heavy, sedating, couchlock, sleep-conducive
Harvest for sleep/heavy indica effect
All Amber
Fully amber/brown
Extensive THC degradation, high CBN
Very sedating, minimal euphoria
Over-ripe — harvest immediately
The practical recommendation for most growers is to target the mixed cloudy/amber window — approximately 70–90% cloudy with 10–30% amber trichomes. This produces the most balanced effect profile that most cannabis consumers find desirable: significant euphoria and mood elevation with sufficient relaxation and body effect. For daytime-specific products targeting energy and creativity, harvesting earlier at predominantly cloudy stage maximises terpene freshness and psychoactive THC content. For medicinal sleep applications, waiting for a higher amber proportion creates a CBN-enriched product with superior sedative properties.
Pistils are the tiny hair-like structures that emerge from female cannabis calyxes. They serve the biological function of catching pollen for fertilisation. In unfertilised (sensimilla) cannabis — the standard in quality cultivation — pistils change colour as the flower matures, providing a visible, magnification-free indicator of ripeness progression.
Early in flower, pistils are white and stand upright, indicating active growth phase and sexual maturity. As the plant approaches harvest readiness, pistils begin curling inward and changing colour from white through orange, red and brown. The percentage of pistils that have changed colour correlates loosely with trichome maturity and provides a useful field guide before committing to closer trichome inspection.
The general guideline is that 50–70% pistil colour change suggests mid-maturity — typically too early for optimal potency. At 70–90% change, the plant is approaching peak ripeness, and trichome examination should be initiated to confirm timing. At 90–100% change, harvest is urgent — the plant is either at peak or beginning to deteriorate, depending on genetics and trichome status.
Pistil colour alone is not a reliable sole indicator because genetics significantly affect the pace and extent of colour change independently of cannabinoid development. Some cultivars show rapid, dramatic pistil colouring while trichomes remain predominantly clear; others maintain white pistils deep into mature trichome development. Environmental stressors — heat, humidity swings, physical contact — can trigger premature pistil colour change without reflecting true cannabinoid maturity. Pistil colour should always be confirmed with trichome inspection before harvest, particularly for first-time grows with unfamiliar genetics.
Magnification Tools: What You Need and How to Use Them
Clear trichome colour differentiation requires magnification. At 10× magnification (standard loupe), trichome shapes are barely visible but colour differentiation is impossible. Reliable staging requires at least 40–60× magnification; 100× is ideal.
Jeweler’s loupe (40–100×): The traditional and most cost-effective trichome inspection tool. A 60× or 100× loupe costs $10–30 and is pocket-sized for use in the garden. The technique requires holding the loupe against one eye, bringing it very close to the bud surface (approximately 5–10 mm) and using ambient or LED light to illuminate the trichomes. It takes practice to achieve a stable, clear view but provides instant portable access to trichome colour in any growing environment. Handheld stability is the primary challenge — any movement during inspection blurs the image. Bracing the hand against the plant or a support significantly improves viewing clarity.
USB digital microscope (60–200×): A significant practical upgrade from the handheld loupe. Digital microscopes connect to a smartphone or computer via USB or WiFi and display trichomes on a screen at 60–200× magnification, with LED illumination built in. This allows stable, comfortable viewing without the posture challenges of a handheld loupe, and screenshots can be taken for comparison across inspection dates. Cost ranges from $15–80 for entry-level to $200+ for professional units with higher resolution sensors. For beginners who struggle with loupe technique, digital microscopes are strongly recommended.
Digital inspection technique: Regardless of tool, correct sample collection is critical. Never inspect trichomes on the plant under intense grow lights — UV and heat damage active inspection, and the contrast against a light source makes colour difficult to read. Inspect in ambient light or use the microscope’s built-in LED. For loupes, cut a small representative sugar leaf from the middle of the canopy — avoid top colas and bottom larf, which ripen at different rates. For whole-plant assessment, check samples from multiple canopy positions and average the readings.
Flushing Before Harvest: Evidence and Debate
Flushing — running plain, pH-adjusted water through the growing medium for the final 7–14 days before harvest without adding nutrients — is one of the most debated practices in cannabis cultivation. The traditional rationale is that flushing removes residual mineral nutrients from the substrate and plant tissue, leading to a cleaner, smoother final product with less "chemical taste."
Scientific evidence on flushing is limited and contested. A 2020 study conducted by Cannabis Benchmarks and published in Colorado State University research found no significant difference in cannabinoid or terpene content between flushed and non-flushed samples from identical plants. Blind sensory panels in some grower community tests have shown inconsistent preferences between flushed and unflushed product. The debate remains unresolved in peer-reviewed literature.
The practical argument for flushing rests on nutrient drawdown: plants use stored nutrients in leaves and stems (nutrient mobilisation) during the final flush period, which may contribute to natural yellowing (nitrogen drawdown) that some cultivators associate with ripeness and flavour development. Opponents argue that peak terpene and cannabinoid synthesis requires adequate nutrition throughout the final weeks, and that premature nutrient deficiency triggered by flushing can reduce final product quality.
Growing medium matters significantly in this debate. In hydroponic systems, flushing rapidly removes dissolved mineral salts from the root zone and is more likely to have a measurable effect. In organic living soil grows, the complex soil biology buffers against rapid nutrient depletion, and "flushing" a living soil system may be counterproductive by disrupting microbial communities. The consensus among organic growers is that living soil products do not require or benefit from pre-harvest flushing.
Drying Cannabis After Harvest
The period immediately after harvest — the drying phase — is as critical to final product quality as any decision made during the grow. Cannabis must be dried slowly and under controlled conditions to preserve terpenes, allow chlorophyll to break down (which reduces harshness), and prevent mould development while maintaining structural integrity of the buds.
Optimal drying conditions: temperature 60–70°F (15–21°C), relative humidity 45–55%, complete darkness and gentle airflow from an oscillating fan (not directed at the hanging cannabis). At these conditions, most cannabis flowers reach the appropriate dryness for jarring in 7–14 days. Humidity above 60% during drying creates mould risk; below 40% causes over-rapid drying that traps chlorophyll in the plant material, resulting in harsh, "green" smoking cannabis with reduced aroma.
Whole-plant hanging (cutting the main stem and hanging the entire plant inverted) produces the slowest, most even drying of all methods and is preferred by quality-focused producers. Individual branch hanging is a practical alternative in limited space. Wet trimming (removing all leaves before drying) accelerates drying speed but leaves less protective buffering for the buds and is more challenging to keep at the optimal 7–14 day window without overshooting to brittleness. Dry trimming (hanging whole branches and trimming after drying) produces a more forgiving drying process and is preferred by most experienced cultivators for flavour preservation.
Readiness check: properly dried cannabis should feel dry on the exterior but retain a slight springiness when a bud is gently squeezed. Small stems should snap rather than bend; the main branches may still have some flex. Buds that are too dry will crumble when handled. If stems snap cleanly but the interior bud still feels slightly springy, the cannabis is at optimal moisture for moving to the cure phase.
Curing Cannabis: The Final Quality Multiplier
Curing is a controlled slow-oxidation and enzymatic decomposition process that occurs after initial drying, when cannabis is placed in sealed containers and monitored over weeks. It is arguably the most under-appreciated step in home production, yet it is responsible for the most measurable differences between commercial-grade and craft-quality cannabis.
During the cure, several simultaneous processes occur. Remaining chlorophyll continues breaking down through enzymatic activity, reducing the harsh "green" notes in flavour and smoke. Residual starches and sugars metabolise, improving combustion quality. Terpene profiles stabilise and in some cases intensify as volatile compounds find equilibrium within the sealed jar environment. Residual moisture redistributes from stem to bud tissue, equalising throughout the container and preventing dry exterior/moist interior issues that would otherwise trigger mould.
Standard cure protocol: place dried buds in glass mason jars to approximately 70–80% full. Include a Boveda or Integra Boost two-way humidity control pack rated for 58–62% RH — this both adds and absorbs moisture to maintain the target range automatically. Store jars in a cool, dark location. For the first week, open (burp) jars for 15–30 minutes once or twice daily to exchange gas, remove excess moisture and check for mould. After the first week, burping frequency can be reduced to once every 2–3 days, then weekly. A minimum 2-week cure produces noticeable improvement; 4–8 weeks significantly transforms flavour and aroma. Some premium boutique producers cure for 3–6 months, developing exceptionally complex aromatic profiles.
Senior Cannabis Editor at ZenWeedGuide. Specialist in cannabis pharmacology, the endocannabinoid system, and evidence-based effect guides.
Last reviewed: May 2026
FAQ: When to Harvest Cannabis
What colour should trichomes be at harvest?
For maximum THC and stimulating effect: harvest when 80–90% of trichomes are cloudy/milky. For a balanced effect: 70% cloudy + 20–30% amber. For heavy, sedating effect: 50%+ amber. Clear trichomes indicate immaturity — wait longer regardless of calendar date.
Can I harvest cannabis using only pistil colour?
Pistil colour is a useful secondary indicator but not sufficient alone. At 70–90% pistils orange/red, initiate trichome inspection. Genetics and environmental stress can cause premature pistil colour change unrelated to cannabinoid maturity. Always confirm with trichome examination.
What magnification tool do I need to check trichomes?
A 60–100x jeweler’s loupe ($10–30) is the minimum for reliable trichome colour differentiation. A USB digital microscope (60–200x, $15–80) is easier to use, especially for beginners, and allows comparison photos over time.
How long should cannabis cure after harvest?
Minimum 2 weeks in glass mason jars at 58–62% RH (with two-way humidity packs). Four to eight weeks significantly improves flavour, aroma and smoothness. Some producers cure 3–6 months for exceptional aromatic development. Burp jars daily in week one, then progressively less frequently.